
1. Download the necessary tools and raspbian operating system image
1. Raspbian Buster Lite (= without desktop interface) through the ZIP option (or torrent).
https://www.raspberrypi.org/downloads/raspbian/
Direct: https://downloads.raspberrypi.org/raspbian_lite_latest
2. Rufus to install the image on to the MicroSD card.
Direct: https://github.com/pbatard/rufus/releases/download/v3.11/rufus-3.11.exe
3. Advanced IP Scanner to figure out the assigned IP address of your Raspberry Pi.
http://www.advanced-ip-scanner.com
Direct: http://www.advanced-ip-scanner.com/download/Advanced_IP_Scanner_2.5.3850.exe
4. If you are not using Windows 10, you can use PuTTY instead of the command prompt to connect to your Raspberry Pi.
https://www.chiark.greenend.org.uk/~sgtatham/putty/latest.html
Direct: https://the.earth.li/~sgtatham/putty/latest/w64/putty-64bit-0.73-installer.msi
5. If you are having issues with the partitions on your MicroSD card, I recommend using MiniTool Partition Wizard. This program makes it very easy to start from scratch by removing every partition on your MicroSD and creating a new Fat32 partition.
https://www.partitionwizard.com/free-partition-manager.html
Direct: https://cdn2.minitool.com/download-center/release/products/pw/current-release/pw11-free.exe
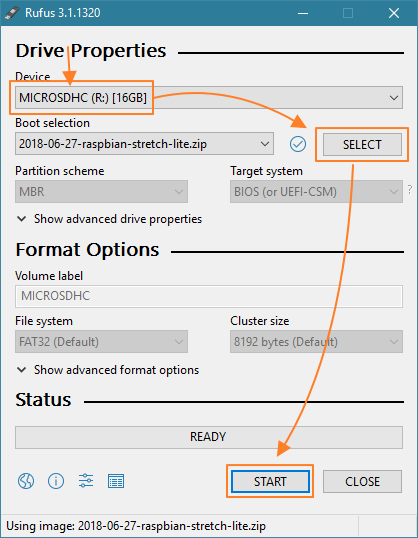
2. Install Raspbian on the MicroSD
Open up Rufus to install Raspbian.
- Make sure your MicroSD card is selected
- Press SELECT and select the downloaded raspbian-stretch-lite.zip
Tip: you don’t have to extract the .zip
- Press START
- Accept the warning about removing all of the data on the MicroSD
- wait until the process is done.
- Windows may ask you to format the Linux partition, do not do this, just cancel the request.
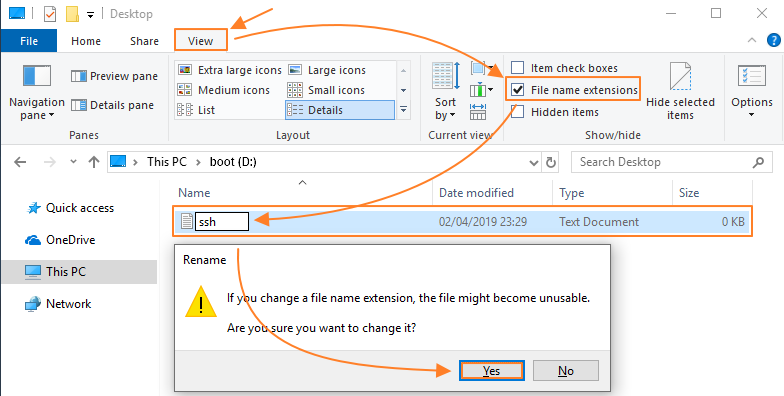
3. Enable SSH
Enable SSH before starting the Raspberry Pi by adding a new text file to the main folder of the MicroSD card (boot partition).
Rename this text file to ssh and remove the .txt extension.
The MicroSD is ready now, insert it into your raspberry pi, connect an ethernet cable and turn on the Raspberry Pi.
Note: It is possible that Windows/Rufus has not assigned a driveletter to the “boot” partition. If you cannot see the drive in file explorer, do a right-mouse click on start, click on disk management and assign a letter to the “boot” partition by right clicking on the 256MB sized partition on your microSD card and assign a drive letter. You can also use the MiniTool Partition Wizard to do this.
4. Lookup the IP address
If you’re using Advanced IP Scanner, you can simply press SCAN and wait until the Raspberry Pi shows up.
5. Login via SSH
1. Open up the command prompt (cmd in start of windows)
Tip: You should be able to paste commands by right clicking into the command prompt.
2. Login with the SSH command
Note: change the IP address with the IP address of your Raspberry Pi
ssh 192.168.1.2 -l pi
3. As we have not defined an SSH key, it will ask if we trust the host.
The authenticity of host '192.168.1.2 (192.168.1.2)' can't be established.
ECDSA key fingerprint is SHA256:XXX. Are you sure you want to continue connecting (yes/no)?   yes
4. When typing in the password, you will not see characters being displayed, simply type it and enter
The default password is: raspberry
6. Change the default password and Update all existing packages
It’s very unsafe to keep the default password, so we’ll change it.After entering the passwd command, it’ll ask you to type the current password once and your new password twice.
pi@raspberrypi:~ $ passwd
Changing password for pi.
(current) UNIX password:
Enter new UNIX password:
Retype new UNIX password:
passwd: password updated successfully
To make sure you have all the latest and greatest (firmware) updates and to clean up any unused/old ones, execute the following command:
sudo apt update && sudo apt full-upgrade -y && sudo apt autoremove -y && sudo apt-get autoclean -y
7. Install Java 8
The default available Java version from Oracle is too old to make the 5.13.X UniFi controller work.Instead of doing multiple extra commands to upgrade this version, we’re just going to install OpenJDK.
sudo apt install openjdk-8-jre-headless jsvc libcommons-daemon-java -y
8. Install MongoDB
The UniFi controller uses MongoDB. You can skip this, but then the installation of the UniFi controller will notice on its first try that it is missing and will install it anyways and then try to install UniFi again. So it’s better to just install it already.
sudo apt install mongodb-server mongodb-clients -y
9. Install the UniFi Controller
You can go to the (beta) updates blog and copy the Debian download link at the bottom of the posts (UniFi Controller for Debian/Ubuntu) if you want a different version than the one used in this tutorial.
https://community.ui.com/releases
1. Use the link with the wget command to download the Controller installation package.
wget https://dl.ui.com/unifi/5.13.32/unifi_sysvinit_all.deb
2. Install UniFi and its dependencies.
sudo dpkg -i unifi_sysvinit_all.deb; sudo apt-get install -f -y
Go to your UniFi Controller via the IP address and port: