
Request delivery and read receipts
At first let’s define the difference between delivery and read receipts. A delivery receipt informs you that your email message was or wasn’t delivered to the recipient’s mailbox. A read receipt shows that the message was opened.
When you send an email, it goes to the recipient’s email server, which delivers it to their inbox. So when you get the delivery receipt it shows that the message successfully reached the intended email server. It doesn’t guarantee that the email is in the recipient’s inbox. It can be accidentally removed to the junk e-mail folder.
The read receipt is sent by the person who opens the message. If you got a confirmation that your email was read by the addressee, it is obvious that the email was also delivered. But not the other way around.
Now I’d like to show you how to request delivery and read receipts for a single message and for all emails you send. You’ll also see how to set a rule based on getting delivery and read receipts in Outlook 2013.
Track a single message
If you’re sending a really important message and want to be sure that the recipient will get it and open it, you can easily add delivery and read requests to this single message:
- Create a new email.
- Click on the OPTIONS tab in the New Email window.
- Tick the ‘Request a Delivery Receipt’ and ‘Request a Read Receipt’ boxes in the Tracking group.
- Press Send.

As soon as the message is delivered and the recipient opens it, you will get the email read notification like the one below.

You see that a common email notification normally contains the recipient’s name and email address, subject, date and time of email sending and when the recipient opened it.
Keep an eye on all sent emails
Let’s imagine another situation. Suppose, all emails you send are crucial and you want to double-check that every single letter reaches its recipient. Then it’s better to request delivery and read receipts for all outgoing messages:
- Click on the FILE tab.
- Choose Options form the FILE menu.
- Click on Mail in the Outlook Options dialog window.
- Scroll down to the Tracking area.
- Check the ‘Delivery receipt confirming the message was delivered to the recipient’s e-mail server’ and ‘Read receipt confirming the recipient viewed the message’ boxes.
- Click OK.

Now you know how to track a single message and all outgoing emails. What if you want to get read receipts only for the emails that have attachments or for those with specific words in the subject or body? Find out the solution in the next part of the article.
Create a read receipt rule
Outlook 2010 and 2013 make it possible to set a special rule to get delivery and read receipts. It means that you will get the notifications if certain conditions are met. Follow the steps below to set a rule according to your needs:
- Launch Outlook.
- Go tothe HOME tab -> Move group.
- Click on Rules.
- Choose the Manage Rules & Alerts option from the Rules drop-down list.
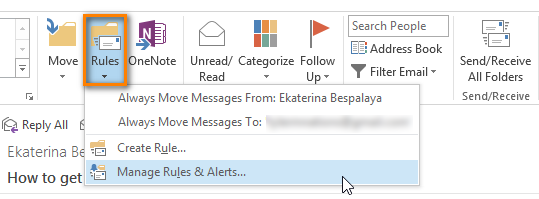
- Click on the E-mail Rules tab in the window that displays on your screen.
- Press the New Rule button to start the Rules Wizard.
- Select ‘Apply rule on messages I receive’ or ‘Apply rule on messages I send’ in the Start from a blank rule section.
- Click Next.
- Tick the condition(s) from the suggested list.
For example, I select the condition ‘with specific words in the recipient’s address’. It means that I request a read receipt only from the recipients who have specific words in their email addresses. What are specific words? Feel free to discover below.
- In the field under the list of conditions click on the link (the underlined value) to edit the rule description.
In my case the underlined value is ‘specific words’.
- Type in a word or phrase to search for in the recipient’s address.
- Click Add and the words will appear in the search list.
- Click OK to save the changes.
We’re back to the Rules Wizard and in the field below the list of conditions I can see that the rule description is nearly complete.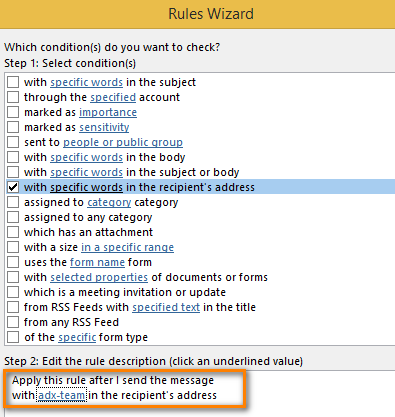
- Click Next to switch to the list of actions.
- Tick the necessary action. In my case I want to be notified when the message is read, so I choose the ‘notify me when it is read’ option.
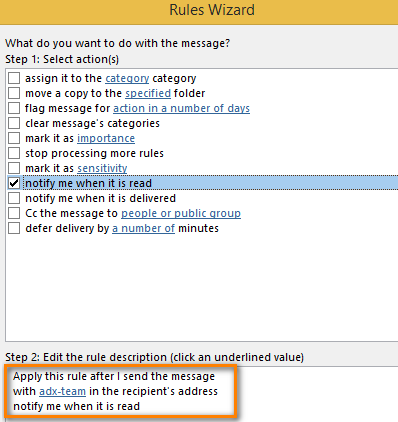
- Click Next.
- Choose any exceptions to your rule, if you think it’s necessary.
I don’t need any for mine.
- Click Next.
- Check if everything is correct in your rule description. You can also specify a name for the rule or set up rule options.
- Click Finish.
- In the Rules and Alerts window first click Apply, and then OK.
Now the rule for requesting a read receipt is set up! So I will get read receipts only for emails I send to the addresses with specific words.
Track receipt responses
Instead of scrolling through hundreds of read receipts in your inbox, use the following trick to see all the recipients who read your e-mail.
- Go to the Sent Items folder.
- Open the message you sent with a request. It is normally marked with a special sign like in the screenshot below.
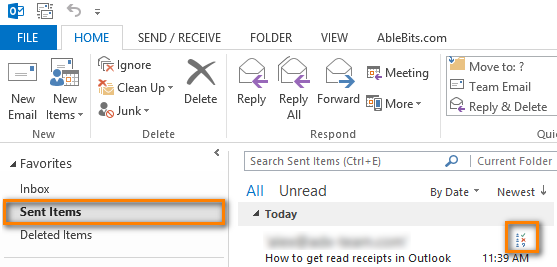
- Click Tracking in the Show group on the MESSAGE tab.
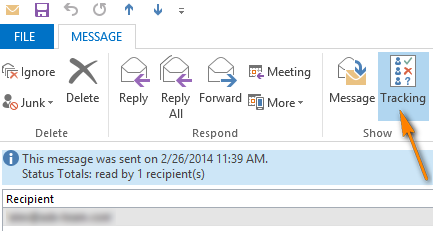
Now you can see how many recipients read your message and when they did it.Note: The Tracking button doesn’t appear until you receive at least one receipt. After you get the first one in your Inbox, it might take several minutes before the button becomes available.
Disable read receipt requests
Now let’s look at the read receipt request from a recipient’s point of view.
If you get it once a year, you are likely to confirm that you get the message. But if you are constantly prompted to send a read receipt for every message you receive, one day it may set your nerves on edge. What can you do?
Method 1.
The read receipt request in Outlook 2013 looks like on the following screenshot.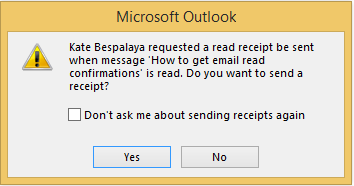 Note:The request message displays only if you double-click the email to open it. If you read the message in the preview pane, the request window won’t pop up. In this case you need to switch to another email for the read receipt request to appear.
If you don’t want the sender to know that you opened and read this particular email, simply choose No. Still you are likely to get the request again. If you don’t want it to happen, select the ‘Don’t ask me about sending receipts again’ check box.

Next time you get the message that includes a read receipt request, Outlook will not show any notification.
Method 2
There is another way to block read receipt requests.
- Go to FILE -> Options.
- Choose Mail from the Outlook Options menu and go down to the Tracking area.
- Select the ‘Never send a read receipt’ radio button.
- Click OK.
